Pages

Showing posts with label Stamping. Show all posts

Thursday, March 13, 2014

Random Picks – China Glaze Westside Warrior & OPI Embarca-Dare Ya

I’m continuing my mission to use up all of my untried polishes, and today my random picks from my untrieds drawer are China Glaze Westside Warrior and OPI Embarca-Dare Ya. I was unsure about how to bring these two together in a mani as they're both so different. I initially thought of doing a floral type design, but I didn't give myself enough time, so I then decided to the stamping efficiency of the OPI polish.


The base is two coats of Westside Warrior, a dark, camo-green creme. I’m in the habit of painting my coats a bit thick, so I might have gotten away with one coat, but went for two to be safe. I then stamped a tribal hand pattern MoYou London's Explorer 11 plate on random spots on my nails, using Embarca-Dare Ya, a lovely magenta shimmer. I topped it off with one coat of Glisten & Glow HK Girl for a super shiny finish.


I really like both of these colours – in the bottle, Westide Warrior looked like one of those love-them-or-hate-them ugly colours, and I’ve been really attracted to these colours recently! I got Embarca-Dare Ya in a 4 pack set of the OPI San Fransisco collection; I got the pack mostly for Alcatraz…Rocks (a gorgeous blue/purple texture polish, also still untried!), and I probably wouldn't have bought Embarca-Dare Ya on its own, but I'm glad I got it in the set. I want to use this as a full mani soon, to see what it’s like on a full nail. It's definitely a winner for stamping though, I had no issues using this on the plate, and the design came out really well. I’m also in love with MoYou’s stamping plates, I need to pick up some more!


All in all, a pretty successful mani, and another two polishes out of the untrieds drawer!

Tuesday, March 4, 2014

Random Picks – W7 Mosaic and Sally Hansen Jaded

I recently sorted through my stash and separated out all of the polishes that I haven't gotten around to using/swatching yet, and I was a little surprised at the amount that I had. I was able to fill a whole drawer of my Helmer with them!

In the few weeks since I've done this, sadly, I still haven't touched the drawer, and I'm still buying more polishes, so I've decided that I’m going to try to stave off my polish buying and use up some of my untrieds. So, I'm going to try and randomly pick two polishes from the drawer every week, and create a mani using those, to get my stash used. This consists of me holding my hands over the drawer with my eyes closed and picking two random bottles. I’m sure I look great doing it. Heh.


This week, my hands randomly picked Mosaic from W7 and Sally Hansen's Jaded. Both of these polishes are quite sheer, and I was initially stumped as to what to do with them. Eventually, I decided I would try jelly sandwiching them, since their formulas were perfect for the technique.


Mosaic is a sheer blue base with a scattering of blue and gold glitter. Jaded is a lovely, jade-green jelly. I painted 2 alternating coats of each, starting with Mosaic and finishing with Jaded. Because I can’t leave well enough alone, I also applied a diamond tile-styled stamp from Bundle Monster plate BM-203, and Barry M gold foil. Initially, I wanted to do some type of fishy, underwater style stamp, as the combination reminded me of the green you'd see under the ocean, but I didn't have any, so my eye was drawn to this stamp. I actually think it works really well, it makes it look quite mosaicy to me (if that makes sense…).


Again, I forgot to take a picture before I stamped (d'oh!), so I hope the stamp doesn't cover the paint job up to much, that you can still see the two polishes together. I think they look quite good, and it turned out better than I thought it would.

Happy days!

Wednesday, February 12, 2014

Baroque stamp with Picture Polish Ultra Violence

I mentioned my long-time craving for some Picture Polish shades in my last post, so when I was ordering from Rainbow Connection, I could't just get one! I also picked up a second beautiful shade, Ultra Violence.
This one was also created through their Blogger collaboration – this time with Lab Muffin
This is a gorgeous royal purple shimmer with pink flecks, and larger coral hex glitters that are also holographic in the right lighting. This was a little sheer at first, but was completely opaque in 2 coats, and I had no issues with application.


I thought putting a nice baroque style design stamp would go well with this one. This design is from Bundle Monster plate BM 214, and stamped with Barry M Silver Foil. This is topped off with 2 coats of Glisten & Glow HK Girl topcoat.


I absolutely love this polish, I'm so glad I picked it up and I'll definitely be wearing it loads!

Monday, February 10, 2014

Peacock-style stamp with Picture Polish Kryptonite

For as long as I've been reading nail blogs, I've been dying to get my hands on some Picture Polish shades, but, seeing as they are an Australian brand, and I’m half the world away, it's not been the easiest task. But now, to my delight (and my bank balance's dismay) a UK based online polish store, Rainbow Connection, have started to stock Picture Polish! Needless to say, I was super excited when I heard the news, and snapped up two polishes the minute the brand launched on the store.


Today I’m showing the gorgeous Kryptonite. This shade was part of one of the brand's Blogger collaborations, and was made in collaboration with More Nail Polish. It’s a beautiful, squishy green jelly with a scattered holo effect. I’ve been eyeing this one for over a year now, so it was a no brainer that I’d snap this one up given half the chance. Here, I've done a simple accent stamp, using a peacock tail style (it's not really, but that's what it reminds me of!) stamp from Bundle Monster plate BM 212, and Barry M Gold Foil. The round parts of the stamp were filled in using OPI Tomorrow Never Dies and a dotting tool. I topped it off with a coat of Glisten & Glow HK Girl topcoat (which I also picked up on Rainbow Connection, and after my first use, I'm really impressed!).


Here's a mediocre shot in direct light, as I try to catch the holo goodness! :p


I really like the stamp on this, and I'm totally in love with the polish. I’m already trying to think up of more nail art ideas for this one so I can use it again! So, Picture Polish definitely get a thumbs up from me, and I already have my eyes on lots more of their shades!

Wednesday, February 5, 2014

Grungy Tribal

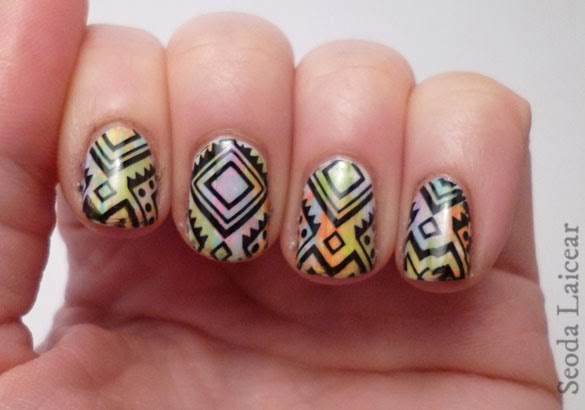
I love checking out other nail art blogs, and seeing all the new techniques and ideas that the amazing bloggers are coming out with. I can struggle a lot with thinking up with unique ideas myself, so I find reading other blogs great for sparking inspiration and ideas. With today's mani, I decided to try out the Distressed Nail Art technique from one of my favourite blogs, the amazing Chalkboard Nails. I thought that this technique, done with some bright colours, would be a great base for a dark tribal design.


I started out with a white base of NYC Pinstripe White. Then, I followed Sarah's tutorial for her Distressed Nail Art, and painted the almost-dry polish brushes in stripes over the white (the tutorial explains this a lot better!), using Essence colours Wanna Be Your Sunshine (yellow), Upper Green Side (green) and Free Hugs (pink), Barry M's Gelly Nail Paint in Mango (orange), OPI You're Such A Budapest (purple) and NYC Blue.L.ita (blue) (also, what a strange name!). I then topped all of this with a coat of No 7 Stay Perfect Topcoat to quickly dry everything and to smooth it out a bit. I then stamped a great tribal design from MoYou London’s Explorer collection plate 11, using Essence's matte black stamping polish. A final coat of No7 Stay Perfect topped everything off and sealed it in.


In hindsight, I think I used too many colours when doing the distressed technique, I probably could have done with only using two or three colours at most (as Sarah also advises in the tutorial). A couple of my nails looked a bit muddy when I put the orange over the green, but once I put the stamp on and finished it up, I actually really liked the result. I'll definitely try this technique again with some other colours, and I'll remember to take a picture of that part before putting anything else over it the next time!

Monday, April 15, 2013

Vintage Pattern


Howdy peeps! The start of another week! I hope everyone has some fun-filled things planned to break up the working week.

I've been a bit strapped for time lately, and for me, the easiest way to get some nail art in that isn't going to take hours is usually to go with some stamping. It's been a while since I had the stamping plates out as well, so I was looking forward to getting stuck in.


Monday, April 8, 2013

17 Rock Hard Nail Effects swatch

Hi there!
I must apologise for the quietness of the blog in the last week, I'm a bad blogger! I've had a crazy couple of weeks, with very little time to myself in the evenings, so unfortunately I didn't have time to write up posts or even properly paint my nails! Thankfully, the madness has abated now, so regular posting will resume once I've caught myself up and have time to get some serious nail art going!


Today I’m showing you some pics I took a couple of weeks ago of a textured polish from the Boots brand, 17. This is one of their rock Hard Nail Effects polishes, their version of the popular textured polishes available these days. There are 4 colours, black, grey, red and blue, and I decided to go for the blue one.
This is two coats with no topcoat. I decided to jazz my thumbs and ring fingers up a little with a snakey stamp from an Essence stamping plate and Barry M Silver Foil.


Tuesday, March 12, 2013

Picture Fail: Swirly Floral

Hola lovelies!

My posting has started to get a bit sporadic of late. I wanted to get into a routine and post the same days every week, hopefully building up to one post a day, but I've been falling behind a bit :( Hopefully I can get back on track, and get some more art and start to get some swatches done so I can build up a backlog of posts, and get a bit more organised.

Today, I have a bit of a picture fail I'm afraid. I have a lovely stamping mani to show you, but I only noticed after I had taken it off that in most of my pics you can't see the actual stamp due to the reflection of my lamp on my nails! Such a rookie mistake, I need to get a light box sorted asap! Also, the sun needs to stick around a bit longer so I can start taking pics in the daylight after work :p

Aaanyway, here are the nails! The amazing blue colour is Bleu Fabuleaux from Bourjois' So Laque range.


I've been looking at it but walking past it for months, but I finally took the plunge after Karen at LovelyGirlieBits reviewed it here a few weeks ago. I'm so glad I did, I think it's my favourite blue at the moment!


I decided to jazz it up a little with a simple, girly, swirly, floraly stamp from a Cheeky plate CH26 and my Barry M Silver Foil. Unfortunately, my indoor pics do not show off the stamp due to reflection, but you can see it better on the couple of daylight ones I managed to get on the bus home from work one day!


I'll defo be wearing this blue a lot, and I have a fab art deco design I want to try with it. I'll be sure to take better pictures next time too!

Thanks for reading!

Ciao for now x

Sunday, February 24, 2013

Glitter Sandwich


Happy Sunday y’all!
I hope everyone’s had a nice weekend. Mine was pretty quiet, filled with food shopping and baking disasters! I attempted to bake these lovely brownies that my friend made during the week – they were sweet potato brownies, and they were delicious (they sound gross, but they really aren't!). Unfortunately, my attempt was miserable, and instead of lovely, spongy brownies I got a hard, dry slab of gack. Oh well, I can at least try them again (or just get my friend to make me some more! :p)

Anywinkle, onto the nails! Today, I have a lovely glitter sandwich and some accent stamping to show you. Glitter sandwiching, if you don’t know, is when you sandwich a layer of glitter polish between layers of another polish. This works best with jelly-finish polishes, as they are usually quite transparent after one coat, so you can see the glitter shine through.


You also get to see Mr Righty today too! This is because I kept smudging my glitter sandwich fingers on my Lefty, and the stamping on Righty is better too. Mr Dominant-Hand seemingly sabotaged my paint job to get his 5 minutes in the limelight, methinks! :p

The lovely red jelly I used for this is Chelsea Cherry from NYC’s Expert Last range. I applied two coats of this on all my nails, and when that was dry, I applied one dabbed coat of The Huntsman, a gold glitter topper from Essence’s Snow White collection, onto my index, middle and pinky fingers. Once that dried (after a few smudging disasters and an eventual coat of Seche Vite to dry the damn things), I applied one more coat of Chelsea Cherry on top. For my thumb and ring fingers, I decided to add a stamp for a bit of variety (and because I can’t leave well alone). I used a cute paw print stamp from Cheeky plate CH27, and stamped with Gold Save The Queen from Rimmel’s Metal Rush set. It wasn't a great polish to stamp with, in hindsight, but in the right light, it changes from a pinky gold, to a greeny one, and I imagine it could be more noticeable on a paler colour. It’s nice though, I’ll have to find another day to try it as a full background colour. I topped everything off with one coat of NYC Grand Central Station and one coat of Essence Better Than Gel Nails, to seal it all of and make it super shiny.


I wasn't really able to capture the glitter very well in the photos - I'm still trying to figure out the best way for taking my pictures, and the glitter was very subtle under the NYC red. It was a nice effect on the nail though, a nice flash of sparkle without being in your face. I really liked it.


Well, I'm off to enjoy the rest of my weekend; I have a nail job in mind, and I'm excited to try it out, even though it's the hardest one I've done so far, and I'm pretty sure it'll be as disastrous as my brownies!

Thanks for reading!

Ciao for now x

Tuesday, February 12, 2013

Dots 'n' Bows


I was in the mood for doing something a little cuter on my nails this week, and I couldn’t decide on whether to do polka dots or practice some more stamping, so I decided, “Hey, I’ve got 10 nails, I can just do both!”. So I did J


Wednesday, February 6, 2013

Doodle-Stamp


If you've been following my posts so far, you will know I currently have quite a large list of untried polishes (currently numbered at 55 polishes). So, I have imposed a polish-buying ban on myself until this list has at least halved (currently 6 polishes down from the original 61, woop!). To assist with the polish cold-turkey, I decided to treat myself to a new set of stamping plates. I decided on a 2012 set by Cheeky, which I got from Amazon here.


Thursday, January 31, 2013

Glitter Paisley


So, on Saturday I was bored, and the weather was awful, so I decided to organise and catalogue my nail polish collection. It turns out I currently have 178 different shades (not including base and topcoats), which was unsurprising, but I also discovered that, of that number, 61 of them I have never worn.

EVER. 

Not even tried on a pinky to see what it was like! So, I’ve put myself on a polish buying ban until at least half of that 61 move to the ‘Tried’ list. We’ll see how long that lasts. Heh.

Anyway, in order to start my plan on the right foot, today’s mani includes two polishes that I’ve used for the first time. I’ve used one and a half coats of Man Hunt by China Glaze (the half was to cover a few bald spots), followed by one coat of my first unused, Dark Knight from Topshop. I. Love. This. Polish!! It’s so pretty!!
The paisley design is from a stamping plate by Essence, and stamped with my second unused, Moonshine, also from Topshop. Everything is topped off with a coat of Seche Vite.


Here’s some dramatic lighting experiments! I need to make myself a proper light box soon…


I seriously can’t stop staring at my nails with this blue polish on. When I look at the quickly, they remind me of coppery/silvery fish swimming underwater!

Thanks for reading! x


Sunday, January 27, 2013

Silver Floral


For my first polish post, I decided to stick to a simple stamp design, and get a bit of stamping practice in! 

The base colour is I Love Bad Boys by Essence Colour & Go, and the floral design is from Bundle Monster plate BM12 and stamped with Barry M Silver Foil.


Stamping is what first got me interested in nail art, so I’m hoping I’ll get loads of practice in through my intended regular posting!

Thanks for reading! x