Pages

Showing posts with label NYC. Show all posts

Saturday, February 15, 2014

Nerdy Nails: Exploding TARDIS

My other passion in life, aside from nail art, is the many fandoms in which I currently partake. I love bringing my two passions together, and celebrating my fandoms in my nail art, so I am very happy to bring my Nerdy Nails back to the blog! I was really in the mood for a good nail art session this week, and after seeing this amazing rendition of the Exploding TARDIS on Adventures in Acetone a few months back, I knew I wanted to try to recreate it myself. Figured now was as good a time as any!


For some background, the Exploding TARDIS came about in series 5 of Doctor Who, as a painting done by Vincent Van Gogh in the episode The Pandorica Opens. One of my favourite episodes, with my favourite Doctor, so I was keen to try and do this as best as I could!


I started off with a base of Bobbing For Baubles from Essie (2 coats). The blue I used in the TARDIS pieces is OPI Keeping Suzi At Bay, and I mixed this blue with some white (NYC Pinstripe White) for some highlighting. The white detail for the windows and note on my index finger is OPI My Boyfriend Scales Walls (I really need to get a new bottle of this – I use it a lot for nail art, but it’s half gone now, and gone all Super-Gloop, and getting harder to use!). For the flame sections and spirals on my pinky and all of my right hand, I used Essence Little Miss Sunrise and OPI My Vampire Is Buff on their own, as well as mixing them for a paler yellow to add to the mix. The burnt orangey-red mix is a mixture of a bunch of colours just to add a bit of contrast (Essence Little Miss Sunrise, OPI My Vampire Is Buff, Barry M Mango, Rimmel Jungle Princess, NYC Fine Red Wine, Rimmel Celebrity Bash).


There was no way I was going to be able to paint a TARDIS with my non-dominant hand, so I took a leaf out of Jacki's book and just replicated some of the swirly flame aspects of the painting to bring both hands together. Everything’s topped off with two coats of Glisten & Glow HK Girl Topcoat.


This type of nail art always looks much better in my head than it does when I actually get to paint it on my nails, but I’m quite happy with how this turned out. And, as always, practice makes perfect, so I know all of these hours will pay off in the long run!

Wednesday, February 5, 2014

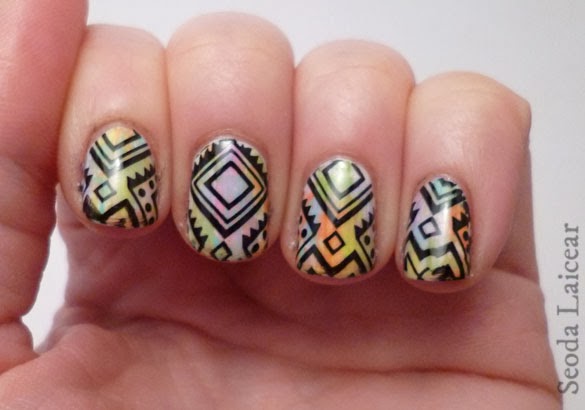
Grungy Tribal

I love checking out other nail art blogs, and seeing all the new techniques and ideas that the amazing bloggers are coming out with. I can struggle a lot with thinking up with unique ideas myself, so I find reading other blogs great for sparking inspiration and ideas. With today's mani, I decided to try out the Distressed Nail Art technique from one of my favourite blogs, the amazing Chalkboard Nails. I thought that this technique, done with some bright colours, would be a great base for a dark tribal design.


I started out with a white base of NYC Pinstripe White. Then, I followed Sarah's tutorial for her Distressed Nail Art, and painted the almost-dry polish brushes in stripes over the white (the tutorial explains this a lot better!), using Essence colours Wanna Be Your Sunshine (yellow), Upper Green Side (green) and Free Hugs (pink), Barry M's Gelly Nail Paint in Mango (orange), OPI You're Such A Budapest (purple) and NYC Blue.L.ita (blue) (also, what a strange name!). I then topped all of this with a coat of No 7 Stay Perfect Topcoat to quickly dry everything and to smooth it out a bit. I then stamped a great tribal design from MoYou London’s Explorer collection plate 11, using Essence's matte black stamping polish. A final coat of No7 Stay Perfect topped everything off and sealed it in.


In hindsight, I think I used too many colours when doing the distressed technique, I probably could have done with only using two or three colours at most (as Sarah also advises in the tutorial). A couple of my nails looked a bit muddy when I put the orange over the green, but once I put the stamp on and finished it up, I actually really liked the result. I'll definitely try this technique again with some other colours, and I'll remember to take a picture of that part before putting anything else over it the next time!

Saturday, April 20, 2013

Nerdy Nails Issue 7: Legend Of Zelda


It’s the weekend! Which means more Nerdy Nails! I have to say, I always look forward to the end of the week and getting stuck into my geeky nail art. It doesn’t always turn out how I imagine, but I love getting the proper art practice in, and I love figuring out the best/easiest way to draw a particular idea.

This week, I've picked one of my favourite video game franchises, Legend of Zelda! This Nintendo classic has been around donkeys years, but I only started to fall in love when The Windwaker came out on the Nintendo GameCube. A great fantasy take on the classic average boy on a quest to save the world from the bad guy, and saving the girl in the process. As always, I've listed each design and colours used to save word space.


Saturday, March 23, 2013

Nerdy Nails Issue 4: Star Wars


I'm really happy with how my Nerdy Nails turned out this week; after my mediocre Avengers attempt last week, I wasn't feeling too confident but I managed to pull these out of the bag. Star Wars holds a special place in my heart - it's the first thing I ever went totally nuts for, and the first fandom I fell into. I really wanted to pay a decent tribute to my first love, and I think I did a pretty good job. I'll try to keep it short, so I'll just list the character on each nail and the colours used.


Friday, March 15, 2013

Nerdy Nails Issue 3: The Avengers!

I've come to the conclusion that drawing circle free-hand on my nails has become the bane of my nail art existence. Maybe I just wasn't in a good mind set for elaborate nail art this week, but my Nerdy Nails didn't turn out too good.


Thursday, March 14, 2013

OPI Liquid Sand Swatch & French Tipped

Howdy y'all!

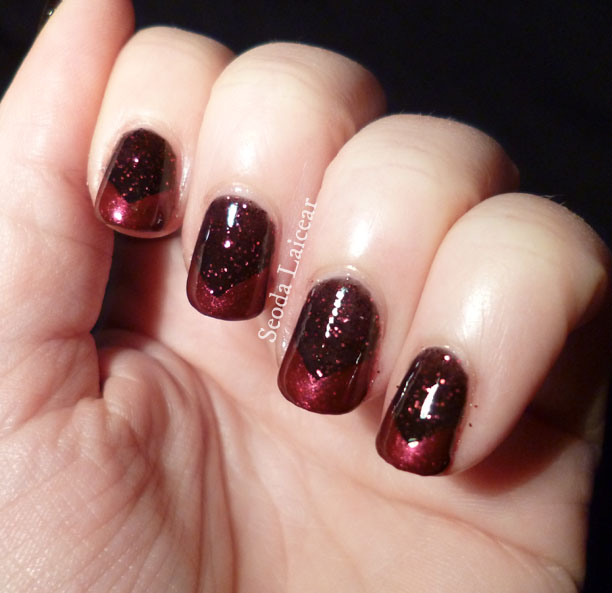
I'm trying out my first texture polish today, and also have my first swatch! This is Stay the Night, one of the Liquid Sand polishes from OPI's Mariah Carey collection. This is a black base with red glitter flowing through it. I decided on this one after seeing it on some other blogs and how amazing it looks when it's top-coated. 


I decided to make it a bit more nail arty by adding some freehand chevron tips. The red I used for these is Chelsea from NYC's In A New York Minute range. I was hoping the tips would show up a bit more, but I was putting it over black, so I'm not sure why I was expecting it to stand out more (duh, Marilyn!).


I top-coated Stay The Night with two coats of Seche Vite before adding the tips, and I added one more coat after the tips were dry. These textured polishes eat top-coat though, after a few hours of drying, my nails still had a slightly rough texture to them.


I haven't worn this in its natural state for a long period yet, so I'm not sure if I'd like having the rough texture on my nails permanently, but I'll report back once I've had a chance to live with it for a while. I do love this one with topcoat though, the glitter really stands out.

I think I like this textured trend. I think the OPI and Zoya collections look best though, as they have added glitter, which I think sets these apart from other brands. The others just tend to look like your normal polish that's been slept on before it's fully dried. I do have one from 17 that I haven't tried yet though, so maybe that will change my mind. I'll post some pics of that one soon.

Thanks for reading!

Ciao for now x

Saturday, March 9, 2013

Nerdy Nails Issue 2: Pac-Man!


As well as being a sci-fi nerd, I’m also a big lover of video games. There’s little I love more than sitting down and spending hours being immersed in a completely new world and forget about real life for a while. 

I have quite a few ideas inspired by my favourite video games that I want to try out on my nails, but I thought I’d start out with something relatively simple, so I decided on Pac-Man! Everyone loves this little circle “wakka wakka”-ing his way around the screen collecting his pellets while being chased around by the colourful monsters, Blinky, Pinky, Inky and Clyde. It’s a classic, but one that always frustrates me! I’m ashamed to say, I don’t think I’ve ever actually been able to get passed one level on this without losing all my lives! Clearly, I just need more practice! :p

So, for my nail art, I decided to dedicate each nail to the five main characters of the game.


Thumb – Pac-Man: I was dreading doing my thumb, as I knew I had to draw a circle free-hand. It didn’t turn out too bad, but this was my second attempt, the first was awful. Colours used were: OPI My Boyfriend Scales Walls (base), NYC Lexington Yellow (yellow), China Glaze Liquid Leather (black)

Index – Blinky: These guys were easy enough to do – I just painted my full nail the colour for the monster, then filled in the eyes and the black bits with a dotting tool and a brush. The main colour for Blinky was China Glaze Red Satin, and his eyes were OPI MBSW again, and Barry M Blueberry Ice Cream for the blue. The black is Liquid Leather.


Middle – Pinky: Next is Pinky. I followed the same method as Blinky above, the base pink is Show Off from Rimmel’s Lycra Pro range, and eyes and black bits are the same as above.

Ring – Inky after power pellet: uh-oh! Poor Inky isn’t looking too good! This is what happens to the monster when Pac-Man eats one of the power pellets, so he can eat these guys and give himself a break from the chase. Here, I used Essence The Boy Next Door for the main blue, and his eyes and mouth were done with Barry M Blueberry Ice Cream. Black is LL again.

Pinky – Clyde: I love that he has a normal name that doesn’t have any resemblance to the other guys. I’m also easily amused :p This little guys was painted with Coral from Barry M, with eyes and black bits the same as the rest of the guys above.


Here's a close up of ol' Pac-Man himself (I didn't notice the two random yellow spots until after I had taken the photos, I must have dented the polish doing something)


I could have done these guys a little better, but I’m happy with them for now. Pac-Man was the hardest, as I’m still getting used to free-handing art, but hopefully with more practice I’ll get there in the end.

Hope you enjoyed this issue of my Nerdy Nails. I have a great idea to assemble for next week’s edition, I just hope I can pull it off!

Thanks for reading!
Ciao for now x