Pages

Showing posts with label free hand. Show all posts

Sunday, May 25, 2014

Ode to S.H.I.E.L.D. with Fandom Cosmetics and A-England


I recently treated myself to some new nail accessories, and thought it was a great time to indulge in my first purchase from Fandom Cosmetics. So, I decided to buy a bunch of nail decals to celebrate some of my favourite fandoms.

They arrived this week, and since I’m in a big Agents of S.H.I.E.L.D. buzz at the moment, so I decided to try these out first. Nail polish wise, I’m still on a little A-England buzz following the 5 polishes I bought recently, so I’ve two A-England polishes featured in this mani.


Thumb, index and pinky were painted with one coat of A-England Camelot. Middle finger was started with 2 coats of China Glaze White on White, and the suit details were painted free-hand using Camelot, and a small bit of Bobbing for Baubles by Essie for the lapels of the suit jacket. Ring finger consists of two coats of A-England Excalibur and one coat of Glisten & Glow HK Girl topcoat to quick-dry before applying the decal. Once that was dry, I removed the nail decal from the backing paper with a pair of tweezers and applied it to the middle of the nail. I finally topped everything off with 2 coats of HK Girl topcoat.


I really like these decals; I think they will be really easy to use. I was a little caught off guard with how sticky they are, as I didn't get this one completely centred, but now I know how they are, I think it’ll be better next time.

Tuesday, May 20, 2014

Freehand Flowers with A-England


*Dusts off more cobwebs*

Howdy again! It’s been ages since my last post – real life is really getting in my way at the moment, but I’m gonna keep trying to get a more regular posting schedule going. Real life has not, however, curbed my polish buying habit, so at least I’ll have plenty to post about!

Today, I have some freehand flowers I painted with some new A-England polishes I treated myself to recently – Camelot and Dancing With Nureyev.


Here, I have two coats of Camelot, a lovely black creme. I could have gotten away with one coat if I was a little more careful, but went with 2 to make sure it was perfect. I then used a nail art brush and painted on some flowers and swirly things with Dancing With Nureyev, a gorgeous light blue holo. I was pleasantly surprised to see that this one was opaque over the black of Camelot, and I’m looking forward to trying this out with some stamping plates!


You can see the gorgeous holo in this picture <3

I thought I'd stick this one in just to show the design on my thumb!

Overall, I'm really pleased with these polishes, and I'll be definitely using them loads!

Thursday, March 6, 2014

Freehand Baroque

My local Penney’s store recently restocked their Essence stand with lots of new polishes, and I find it increasingly more difficult to walk past it without buying something, so I've bought a few of their new colours over the last few days. It’s a really good thing that they are so cheap!


Today, I wanted to use a lovely deep, forest green called Deep Sea, Baby. The opacity of this is really good, I’ve painted just one coat as the base here. Could be down to my shorties though! I decided to try my hand at some freehand baroque patterns, I’ve seen some lovely freehand baroque manis and wanted to try it out. The pattern is painted with A-England Saint George. I thought having it in the same colour family, and with a bit of holo goodness would be a bit different. The next time though, I’ll paint the design under direct light, so I’ll be able to see what I'm doing, lol!


The actual design isn't great, I could have benefited from being able to see what I was doing, but I like the flashes of the holo green against the dark base, even if you can't see what it is :p

Friday, February 28, 2014

Lacquer Legion: Adoration – Tatooine Sunset

A few of my favourite bloggers, Chalkboard Nails, The Nailasaurus, Rebecca Likes Nails, and Work Play Polish have created a new monthly nail art challenge called the Lacquer Legion, and this month I decided to join in! This month’s prompt is Adoration, so I decided to try and combine a nail art technique that I love with one of my favourite nerdy fandoms – gradients and Star Wars!


Star Wars was my very first proper nerdy obsession, but I admit, I have been neglecting it for some of my other fandoms of late, so I felt it was time to give it some love again. I have done some Star Wars art before, in the shape of different helmets, but the idea of painting the famous Tatooine Twin Sunset came to me a few weeks ago, and I thought this nail art challenge would be the perfect excuse to try it out.


Solo thumb shot (Please excuse the cut!)

I started with a base of China Glaze Life Is Rosy, and sponged a gradient of Life Is Rosy with China Glaze Fade Into Hue once that was dry. After about 4 to 5 layers of sponging, I put one coat of Glisten & Glow HK Girl for a quick dry and to help blend the gradient together. The sandy tips are a mixture of Rimmel Beige Style, Beige Babe, and OPI My Vampire Is Buff. The suns were done using the end of a striper brush, with OPI MVIB again (middle finger), and Essence Free Hugs (ring finger). The dome of the Beru household was done using the sandy mixture again, and MVIB for the detail.


In hindsight, I should have painted the thumb design sideways on my thumb, as trying to take a photo of all of my nails together was awkward, and resulted in some creepy hand poses!


I enjoyed painting this for the challenge, even though I think my gradient could have been much better. Nice for the practice though! I can’t wait to see all of the other manicures from this challenge, I think there are going to be some great ones!

Saturday, February 15, 2014

Nerdy Nails: Exploding TARDIS

My other passion in life, aside from nail art, is the many fandoms in which I currently partake. I love bringing my two passions together, and celebrating my fandoms in my nail art, so I am very happy to bring my Nerdy Nails back to the blog! I was really in the mood for a good nail art session this week, and after seeing this amazing rendition of the Exploding TARDIS on Adventures in Acetone a few months back, I knew I wanted to try to recreate it myself. Figured now was as good a time as any!


For some background, the Exploding TARDIS came about in series 5 of Doctor Who, as a painting done by Vincent Van Gogh in the episode The Pandorica Opens. One of my favourite episodes, with my favourite Doctor, so I was keen to try and do this as best as I could!


I started off with a base of Bobbing For Baubles from Essie (2 coats). The blue I used in the TARDIS pieces is OPI Keeping Suzi At Bay, and I mixed this blue with some white (NYC Pinstripe White) for some highlighting. The white detail for the windows and note on my index finger is OPI My Boyfriend Scales Walls (I really need to get a new bottle of this – I use it a lot for nail art, but it’s half gone now, and gone all Super-Gloop, and getting harder to use!). For the flame sections and spirals on my pinky and all of my right hand, I used Essence Little Miss Sunrise and OPI My Vampire Is Buff on their own, as well as mixing them for a paler yellow to add to the mix. The burnt orangey-red mix is a mixture of a bunch of colours just to add a bit of contrast (Essence Little Miss Sunrise, OPI My Vampire Is Buff, Barry M Mango, Rimmel Jungle Princess, NYC Fine Red Wine, Rimmel Celebrity Bash).


There was no way I was going to be able to paint a TARDIS with my non-dominant hand, so I took a leaf out of Jacki's book and just replicated some of the swirly flame aspects of the painting to bring both hands together. Everything’s topped off with two coats of Glisten & Glow HK Girl Topcoat.


This type of nail art always looks much better in my head than it does when I actually get to paint it on my nails, but I’m quite happy with how this turned out. And, as always, practice makes perfect, so I know all of these hours will pay off in the long run!

Thursday, January 30, 2014

Plaid Style with Colour Club Harlem Lights

I recently picked up my first bottles of Colour Club polish when I snuck into TK Maxx while in Dublin last week. I picked up the Harlem Lights collection, and immediately thought a plaid style design would go well with the cremes in this set. 


The base here is 2 coats Poetic Hues, a yellow toned nude, and I used my striper brush to paint on Lady Holiday (grey) and Baldwin Blues (blue). I topped this with two coats of Sally Hansen Insta-Dri topcoat.


The one thing I don't like about the Colour Club sets in TK Maxx is that the bottles don't come with names (I like when brands give their polishes proper names instead of numbers, so when they have neither, it's really annoying!), it would be nice if they even had a list on the back of the boxes or something. Nothing that’s not solved with a quick trip to Google Search though! :)
In any case, I really liked the three cremes of this set, and I'm looking forward to trying out the rest!

Ciao for now! x

Sunday, January 26, 2014

Blue Cross

One particular element of nail art that I feel I need a lot of practice with is striping, and getting used to using my long striping brushes. I also recently separated all of my unused polishes from the rest in my stash, and found that I had an awful lot more than I realised, so in today's mani I’m getting my stripey-stripe on while using up some unused polishes as well. I saw this criss-cross style design online in various different places, and thought it would be a good one to practice.


The base for this mani is Baby Blue from GOSH Cosmetics' Oh My Gosh range, and the crosses and stripes are China Glaze Turned Up Turquoise, painted with a striper brush.


It wasn't a bad effort, although I did mess up my index finger something awful! It was one of those rare manis that actually looked passable when I did the stripes on my right hand too, so it was a relative win-win all round!
Ciao for now! x

Tuesday, April 23, 2013

Lace pattern with Rimmel Salon Pro and Barry M Nail Art Pens!


Happy Tuesday!

I still haven’t gotten around to spending an afternoon doing a lot of swatches/nail arty things, so my post schedules are still a little haphazard/flying-by-the-seat-of-my-pants styleee. Hopefully in the next few weeks I’ll be able to devote some quality hours to my beloved hobby (although, with two UK trips and a move coming up in the next 6/7 weeks, that's probs unlikely. Nice to have goals though, eh?).

To the nails! Today, I'm showing you some new nail swag, in the form of the new Rimmel Salon Pro polishes, and Barry M's Nail Art Pens!


This swag was a complete impulse buy last week. I was in Boots for my bi-weekly perusal, which usually consists of me staring at all the lovely polishes, and testing my purchasing will power. Said will power went completely out the window once I saw that they recently stocked Rimmel's new Salon Pro range. After staring at all the bottles for an age, I finally decided on Barmy Blue, a new, lovely royal blue colour that I assume is in the core range, and Britpop, a cool blue-green from the Kate Moss shades. 


Just as I was about to walk to the counter, I spied the Barry M stand, and my eyes landed on the new Nail Art Pens, and I nearly mowed down a couple of fellow shoppers to get my hands on them. I limited myself to the black and white ones, as I figured I’d use those more (I've since gone back and bought the pink and silver pens, and I’m currently rattling my brain, trying to think of a good idea to use them for!).


So, I couldn't wait to break these babies open, so once I got home I got to nail artin'! I couldn't decide on what ones I wanted to use first, so I just decided to incorporate them all into this mani! I used Britpop on my thumb and ring fingers, and Barmy Blue on the rest. You could get away with one coat of Britpop, it’s a great opaque creme, but I used two here just to make sure my nails were covered. Barmy Blue is a bit more sheer, but two coats was all I needed for total coverage. I plopped a coat of Seche Vite on top to quick dry the polish so I could test out the nail art pens. I decided on trying my hand at a lace design for the first time, and used the black over Britpop, and the white over Barmy Blue, as I didn't think the black would be very noticeable over that one.


I really like the Rimmel polishes, the polish goes on well and the brush is nice and wide so minimal strokes are required (same as always with these bad boys). The star of the show for this one is the Nail Art Pens for me though. I absolutely LOVE these, they are going to completely change my nail art for the better. I’m still struggling with getting to grips with using the small, thin brushes for my art, but these pens are so easy to control, and I know I’ll be using these a lot! I'm particularly looking forward to trying out circular/spiral shapes, as they are my nail art kryptonite when it comes to using brushes! I really hope Barry M decide to release these in a bunch more colours, because they really are brilliant.


I hope y'all liked these today, and apologies for the wordy post! I just felt like adding a bit of a review on these I guess, particularly since I love the pens so much :)

Thanks for reading!

Ciao for now x

Saturday, April 20, 2013

Nerdy Nails Issue 7: Legend Of Zelda


It’s the weekend! Which means more Nerdy Nails! I have to say, I always look forward to the end of the week and getting stuck into my geeky nail art. It doesn’t always turn out how I imagine, but I love getting the proper art practice in, and I love figuring out the best/easiest way to draw a particular idea.

This week, I've picked one of my favourite video game franchises, Legend of Zelda! This Nintendo classic has been around donkeys years, but I only started to fall in love when The Windwaker came out on the Nintendo GameCube. A great fantasy take on the classic average boy on a quest to save the world from the bad guy, and saving the girl in the process. As always, I've listed each design and colours used to save word space.


Saturday, April 13, 2013

Nerdy Nails Issue 6: Avatar: The Last Airbender

Follow my blog with Bloglovin


Howdy peeps! Time for another issue of Nerdy Nails! After the unexpected hiatus last week, I decided I would come back with an idea I've had and have been wanting to paint for ages. These are in tribute to one of my favourite animated shows, Avatar: The Last Airbender!


Sunday, March 31, 2013

Easter nails with (mostly) OPI and Essence!


Howdy peeps!

I hope everyone is having a good long weekend, and enjoying the end of Lent and eating loads of chocolate!

In celebration, I’ve decided to decorate my nails with some Easter egg and chick and bunny art! I was thrilled to get stuck into these ones – the bright colours really cheered me up after the miserable week of snow and coldness we’ve had.


Saturday, March 30, 2013

Nerdy Nails Issue 5: Doctor Who

Happy Easter y'all!

Hope everyone's enjoying the long weekend so far. Mine has just started, as I had to work today, but I'm looking forward to enjoying my three days off!

Today's Nerdy Nails are in celebration of one of my favourite TV shows, Doctor Who! DW is back this Saturday for the second half of Series 7, and its very exciting! So I had to do my nails in tribute to everyone's favourite Time Lord. As before, I'll try to keep it short, and explain the design for each nail and the colours used.


Saturday, March 23, 2013

Nerdy Nails Issue 4: Star Wars


I'm really happy with how my Nerdy Nails turned out this week; after my mediocre Avengers attempt last week, I wasn't feeling too confident but I managed to pull these out of the bag. Star Wars holds a special place in my heart - it's the first thing I ever went totally nuts for, and the first fandom I fell into. I really wanted to pay a decent tribute to my first love, and I think I did a pretty good job. I'll try to keep it short, so I'll just list the character on each nail and the colours used.


Friday, March 15, 2013

Nerdy Nails Issue 3: The Avengers!

I've come to the conclusion that drawing circle free-hand on my nails has become the bane of my nail art existence. Maybe I just wasn't in a good mind set for elaborate nail art this week, but my Nerdy Nails didn't turn out too good.


Thursday, March 14, 2013

OPI Liquid Sand Swatch & French Tipped

Howdy y'all!

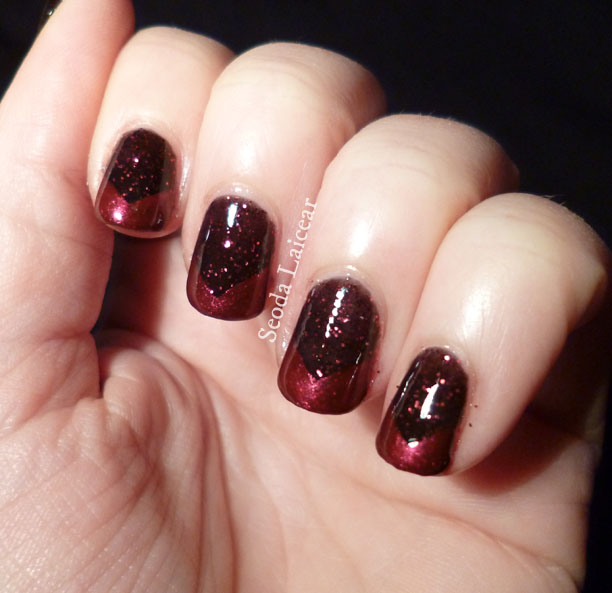
I'm trying out my first texture polish today, and also have my first swatch! This is Stay the Night, one of the Liquid Sand polishes from OPI's Mariah Carey collection. This is a black base with red glitter flowing through it. I decided on this one after seeing it on some other blogs and how amazing it looks when it's top-coated. 


I decided to make it a bit more nail arty by adding some freehand chevron tips. The red I used for these is Chelsea from NYC's In A New York Minute range. I was hoping the tips would show up a bit more, but I was putting it over black, so I'm not sure why I was expecting it to stand out more (duh, Marilyn!).


I top-coated Stay The Night with two coats of Seche Vite before adding the tips, and I added one more coat after the tips were dry. These textured polishes eat top-coat though, after a few hours of drying, my nails still had a slightly rough texture to them.


I haven't worn this in its natural state for a long period yet, so I'm not sure if I'd like having the rough texture on my nails permanently, but I'll report back once I've had a chance to live with it for a while. I do love this one with topcoat though, the glitter really stands out.

I think I like this textured trend. I think the OPI and Zoya collections look best though, as they have added glitter, which I think sets these apart from other brands. The others just tend to look like your normal polish that's been slept on before it's fully dried. I do have one from 17 that I haven't tried yet though, so maybe that will change my mind. I'll post some pics of that one soon.

Thanks for reading!

Ciao for now x

Friday, February 15, 2013

Zebra Print


Happy Friday people!
I hope everyone has some good plans for the weekend. I’ll be at home spending some time with the family, looking forward to it, it should be fun.

Anywho, to the nails! I was feeling the need to try out some animal prints this week, so I decided to try a zebra print since I hadn't tried one before.


Thursday, February 14, 2013

Wearing My Hearts On My Nails!


Happy Valentine’s Day peeps!!

I couldn’t let a festive day go by without decorating my nails in tribute. After much deliberation, I decided to just cover my nails with some simple heart shapes. I took my inspiration from this awesome art done by Chalkboard Nails (My favourite nail blog - Sarah’s swatches and nail art are amazing! And I’m jealous of her lovely nails!), but switched it up a bit and went with hearts instead of lips.